In this chapter, we will learn:
- Compilation and Interpretation of a programming language.
- Java Technologies family
- JDK Installation
- Eclipse Installation
- Java Package
- Edit and Run a Java program
The concepts and knowledge points you must master in this lesson are highlighted.
1. Programming Languages
A programming language is comprised of a set of semantic and syntax rules that people can read and understand, then to be executed in a computer system that supports that programming language.
A computer system reads all data and instruction in a binary format in bytes. The code people write cannot be understood by a computer system directly.
Binary has only “0” and “1”. “0000” means 0, “0001” means “1”, and “0010” means “2”. All characters we enter from a keyboard are encoded into a binary format and stored on a disk. It can be read back and translated to an understandable format and displayed on the screen. Each “0” or “1” is a bit. 8 bits form a byte.
After writing a piece of computer code, the code has to be turned into a format the computer can understand. Usually, there are 2 ways to achieve that.
Compilation: The source codes are compiled into an executable format. Then, a computer can execute the executable.
Interpretation: A computer reads the source code line by line. A line of code is read and interpreted into the format the computer can understand and then execute it. Then read the next line from the source code.
Compilation can save lots of time of source code processing at the run time. However, each executable can only run on the specific operating system. If you want to run the same code in a different operating system, then you have to compile the source code in that operating system specifically.
Java is different to the two methods described above. Java provides various VM (virtual machine) to be installed on all commonly seem operating systems (e.g. Windows, Linux, and some mobile operating systems). The Java source codes are first compiled into a VM-executable format, and then run the VM-executable on the VM. In this way, Java becomes a “Write Once, Run Anywhere ” programming language. That mean, once the Java source codes are completed, they will be compiled into an operating system neutral format.
Java source code has extension “.java”. The operating system neutral VM-executables have extension “.class”. We will see “.jar” extension when we do Java packaging for distribution.
2. Java
Java has a set of technologies. Java SE (Standard Edition), Java EE (Enterprise Edition), Java ME (Mobile Edition), Java Card, Java TV, Java DB, etc.
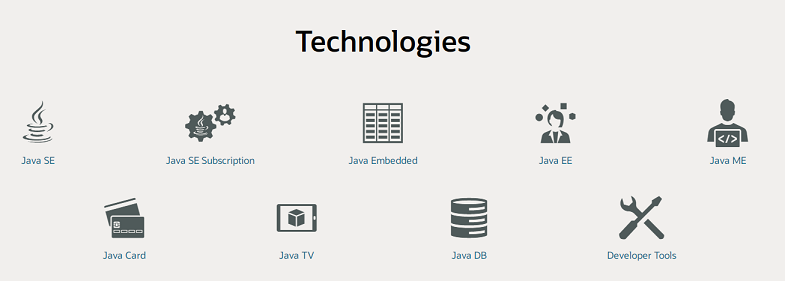
Java language is the backbone of the Java technologies family. Java SE defines the Java language syntax and all basic rules for compilation, packaging, and execution. In this tutorial, we will learn Java in the scope of Java SE.
Some terminologies (or abbreviations) we need to know:
- JDK: Java Development Kit
- SDK: Software Development Kit
3. JDK installation
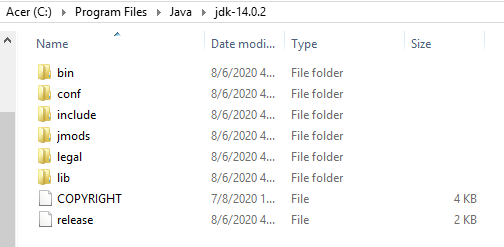
Go to Java SE download site to download the latest JDK and documentation (highly recommended).
Java SE download page: https://www.oracle.com/java/technologies/javase-downloads.html
The download page lists all available distribution packages to fit different operating systems. If you are using Windows, then you can download the Windows X64 installer. You can also find the installers for MacOS and Linux.
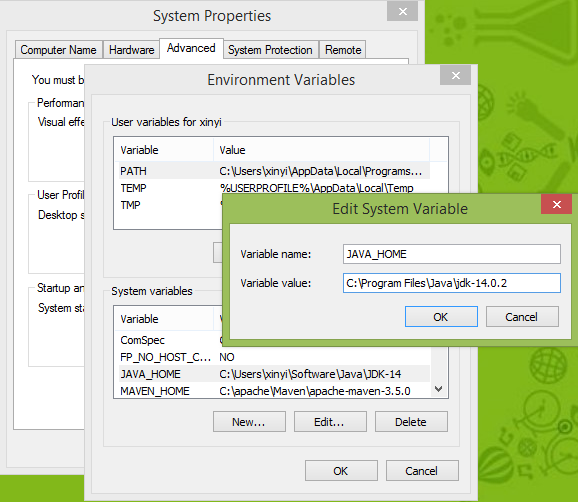
After installing JDK, we need to set Windows environment variables:
(In Windows, find “Control Panel” – “System” – “Advanced System Settings” – “Advanced” tab – “Environment Variables …” button)
If “JAVA_HOME” doesn’t exist, add this variable and set its value with your JDK installation directory.
Find “path” variable, make sure “%JAVA_HOME%\bin” is added
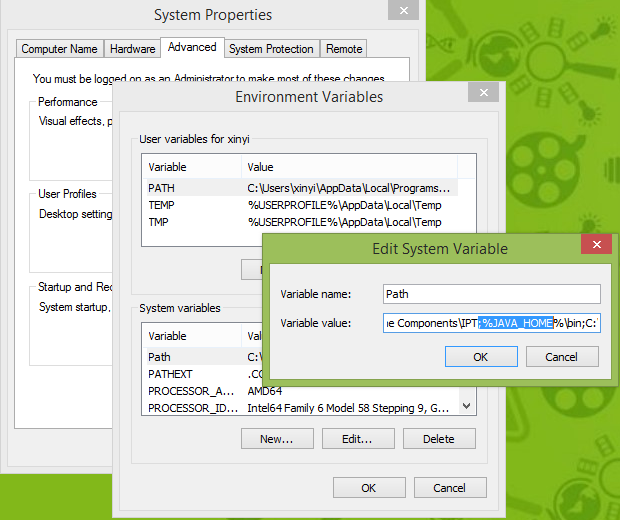
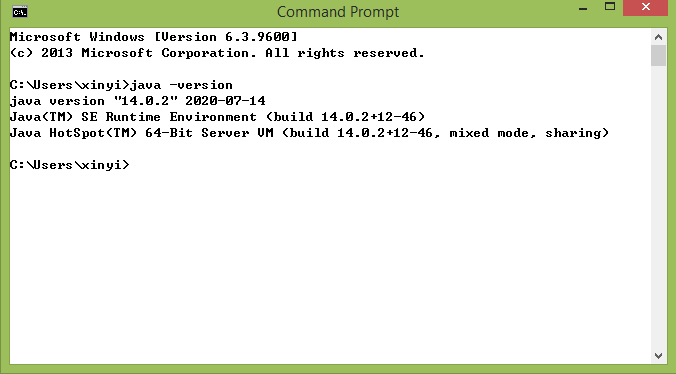
Once the above environment variables are configured and saved, open a new command window and enter “java -version”, the version of your installed Java language is displayed.
Then we create a new file “Hello.java”. It doesn’t matter where you create this file, however you have to pay attention that: 1) Java is case-sensitive. It is Hello has an uppercase “H”; 2) The file extension is “java”, which indicate it is Java source code.
The Java source code (.java file) is just a text file. It can be edited in any plain text editor, such as Notepad, TextPad, or Notepad++.
Compile the Java source code by using “javac” command. Once it compilation is successfully completed, we can see a new file Hello.class file has been created. Run the application by using “java” command.
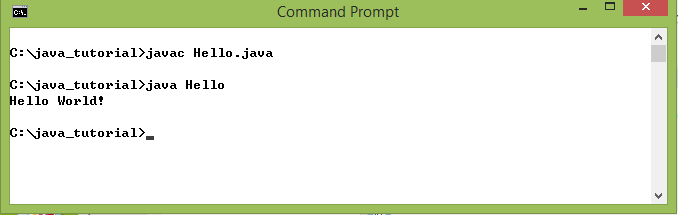
If you see the program prints “Hello World!”, congratulations!
4. A basic structure of a Java program
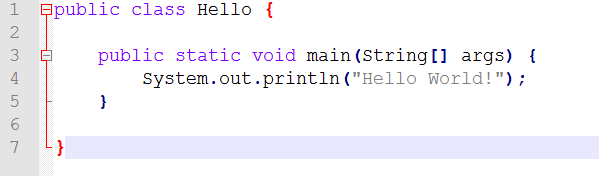
Let’s revisit Hello.java
public class Hello {

    public static void main(String[] args) {
        System.out.println("Hello World!");
    }

}
In Hello.java, we can easily see there is a keyword “class” right before the class name “Hello”. Java is an objective-oriented programming language. We will cover the concept “object” more in future lessons. Just remember, the Java program comprises of a set of “.java” files. Each “.java” defines one or more classes or interfaces. The public class name “Hello” must exactly match the Java source file name (e.g. Hello.java). In a Java class, there is only one method named “main” defined. The public static void main() method defines the entry point of a program. The main() method is optional. It exists only if the class is the entry point of the entire program (with many classes). And, every line of the code is concluded by “;”.
In Hello.java, you may ask questions about the public static, String[], void. Yes, these are very important concepts in Java. We will cover them in future lessons as well.
5. Organizing Codes
When we have only one Java class in a Java project, we don’t have to worry about how to organize the code. However, when the project is growing lager and lager, we have to organize the source codes properly for better maintainability. Java has a solution for that — package.
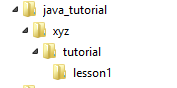
A Java package is a logical group of a set of Java files based on their characteristics of roles. The package is a series of name separated by “.”. The dot also physically mean a directory path structure. For example, if we assign the Hello.java with “xyz.tutorial.lesson1” package, we should manually create the sub-directories like this, and place the Hello.java under the lesson1 folder.
In the Hello.java, we have add one more line to describe the package (It also tells from which directory hierarchy the code can be found)
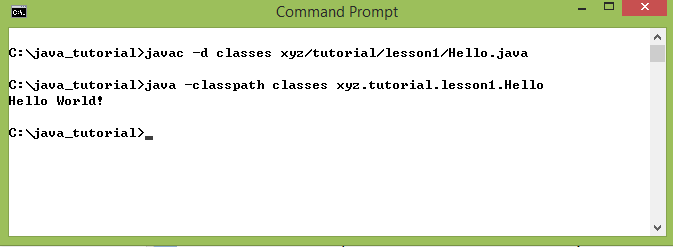
To compile the Java source code with package, we need to specify the path where the Java compiler can access the source code.
javac -d classes xyz/tutorial/lesson1/Hello.java
In this command, we add one command line parameter “-d”. This parameter instructs the compiler to output the compiled “.class” file in the “classes” folder. If the output folder doesn’t exist, the compiler will create it. Then we can see the folder structure is changed.
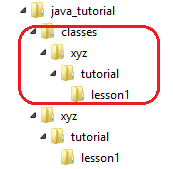
Above screenshot shows the output directories automatically created by the compiler.
Accordingly, we need to supply the fully qualified name (class name with package) to run the “java” command. Since we have specified the output folder (to place the output from the compilation), we must use “-classpath” command line parameter to tell the Java command where to find the “.class” files
6. Coding Convention
Java syntax derived from C. There are many programming languages are in very similar coding format. We will follow standard Java Coding Convention in this Java series tutorial. Failing to follow the Java Coding Convention won’t fail a program, but make the code unprofessional. If you have previous programming experiences with other languages, please be aware of the differences and make sure complying the coding guidelines. Eclipse has a function to automatically adjust the format of your code.
7. Eclipse installation
Eclipse is one of the popular Java development tools. Here is its download page: https://www.eclipse.org/downloads/. Under the Eclipse icon, find the “Download Packages” link, then download the “Eclipse IDE for Java Developer” for your operating system.
If you are using Windows, the Eclipse package for Windows is a large zip file. Extract that zip file into a folder where you like to place your Eclipse IDE (IDE stands for “Integrated Development Environment”).
There is an optional step you may like to do. This step can make opening your workspace much easier. First, creating a shortcut of your Eclipse application on your desktop. Second, right-click the shortcut icon and select “Properties”; Third, append “-data” in the Target box.
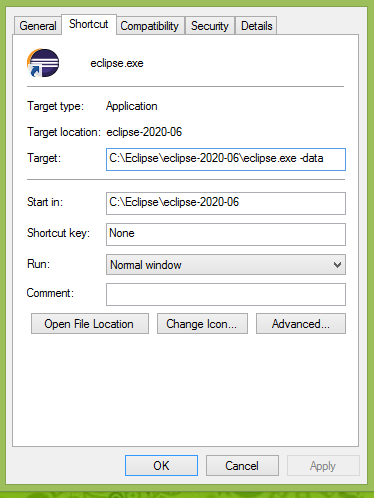
Once you have the “-data” set, and can create a folder as your workspace. Simple drag your workspace folder over the Eclipse icon, your workspace will be opened in Eclipse. Without “-data”, the Eclipse will ask you the location of your workspace every time.
The following steps will create our first Java project and run Hello program in the Eclipse.
- In the Eclipse main menu, File -> New -> Java Project
- Enter the project name “Lesson1”
- Make sure the “Create separate folder for sources and class files” is checked
- Finish (A Java project “Lesson1” is created)
- Right-click the “src” icon, from the popup memu, select New –> Package
- Enter the package name: xyz.tutorial.lesson1
- Right-click the newly created package “xyz.tutorial.lesson1”, from the popup menu, select New –> Class
- Enter the class name: Hello
- Check the option “public static void main(String[] args)”. The main() method will be created by checking this option.
- Finish (Hello.java is created)
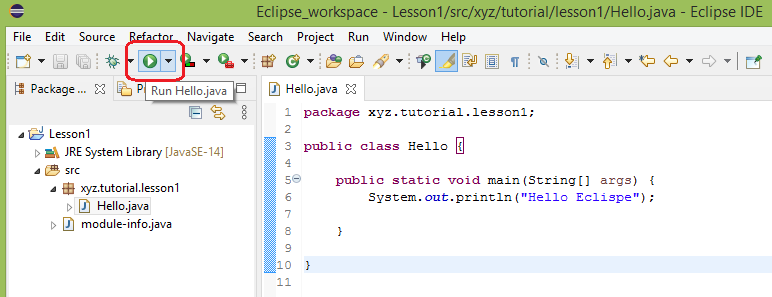
- In the Java editor, complete the code for console printout.
- Save the Java source code by Ctrl-S
- In the menu bar, click the green (Run) button to execute the program.
- We will see the printout in the console pane.
Eclipse will compile the Java source code automatically every time we save the file. With Eclipse IDE, a developer doesn’t have to use either “javac” compilation command or “java” execution command. Even if the Eclipse IDE bring us all the convenience. It is still valuable to be aware of using the Java commands in the command window. It is beneficial on learning Java advanced features.
Exercises
- Install JDK on your computer and capture a screenshot of the Java version from your command window.
- Install Eclipse on your computer
- Edit and Run Hello program in your command window.
- Create a “Java_Tutorial” project in the Eclipse. Create a “Hello” program under package “xyz.javaTutorial.lesson1, and then run the “Hello” program.