In this chapter, we will learn:
- Array
- Conditions
- Loop
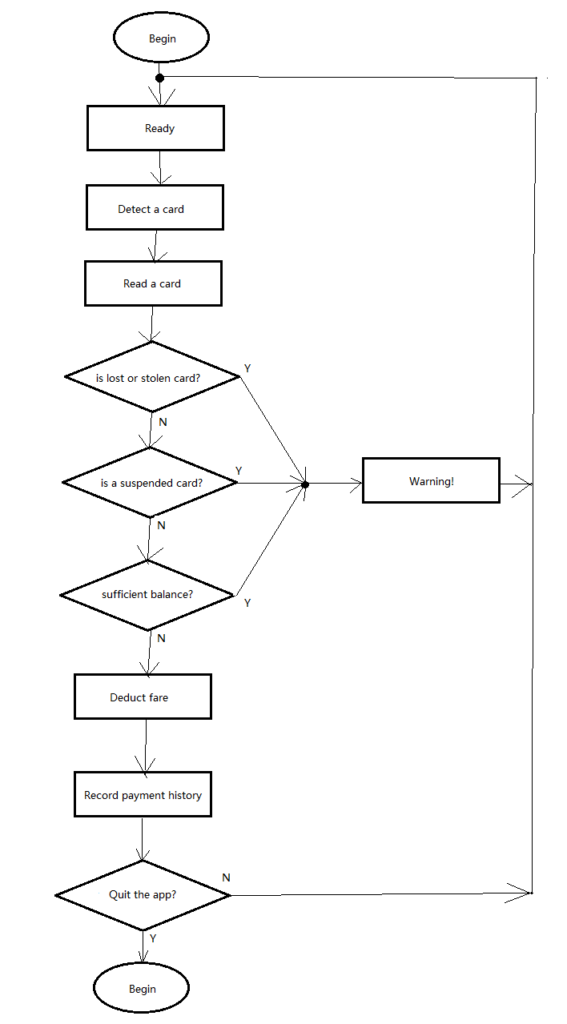
1. Workflow
An application must fulfill certain business functions. The business function can be simple like a calculation of 1 plus 2. It can also be complex like booking Raptor tickets from the TicketMaster. The business functions are usually divided into small units or some shared utility functions (for example, credit card payment can be used for booking movie tickets and paying a government service fee). The business functions are fulfilled by a sequence of these small units, in the planed order with conditions. We call this: workflow.
Here is a traditional workflow diagram.
A rectangle block represents a small functional unit. It has one input and one output.
A diamond represents a condition. It has one input, and two outputs marked with Y (Yes) and N (No). Yes and No are natural language. In the computer system, we will use “true” and “false”, the boolean values in the technical language. The conditioning unit will evaluate the input, if the condition is met, then the workflow continues with the “Y” output, otherwise, continues with “N” output.
The allows represent the directions (sequence).
The dot means multiple sources are merged here. Or say, the input can come from different functional units. However, at any specific point of time, there is one source supplying the input. That also means the concurrent inputs from multiple sources are not the case in the scope of this diagram.
Workflow has 2 ends. The “Begin” at the top and the “End” at the button. These two ends are not functional units. They are states of the application. If a diagram shows no “End” state means the workflow will run into an infinite loop. An infinite loop is a common mistake in programming.
We can see the workflow could go back to where it starts. It means this is a loop.
All these units form a complete workflow (to fulfill a business function). Smaller functional units can be implemented with methods. We will learn to program for conditions and loop in this lesson.
2. Array
An array is a list data with the same type. It can declared with [].
		int a[] = new int[3];
		int[] b = { 1, 4, 9, 67, 150 };
We can apply the [] to its type or to its reference (the identifier of the variable). Array declaration in both ways are identical.
An array can be initialized with all elements, or just by assigning the length of the array without assigning any values to its elements.
An array is a fixed number of its elements. That means once an array is initialized, the number of the elements in an array cannot be changed. The total number of elements in an array is called the array’s length. Every array has a “length” attribute that helps us to check the length of that array..
An array is ordered. Each element in an array has an index associated with it. The first element in an array has the index value 0. The last element has the index value equals to the array’s length minus 1.
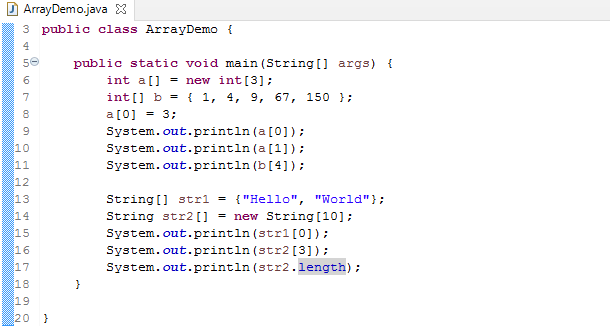
The above example demonstrates the array declaration, initialization, value assignment to a specific element, reading the value from a specific element, and checking array length. When we attempt to access an element in an array, we may mistakenly attempt to access an element with its index greater to the array’s length, an ArrayIndexOutOfBoundsException will be thrown at the run time. The Java compile doesn’t know the array length during the compilation so this type of error is considered in the runtime exception category. Just keep in mind there is such error (exception), we will cover that in detail when we learn the exception handling.
In the sample code, String str2[] = new String[10]; declare an array of type String with 10 elements. The values are not assigned during the initialization. We can access one of the elements by specifying the index. For example: str[3]
3. if – else
In the natural language, a condition can be expressed like this. If the room temperature is 27 degree or higher, then turn on air conditioner. With Java, we can do in a similar way.
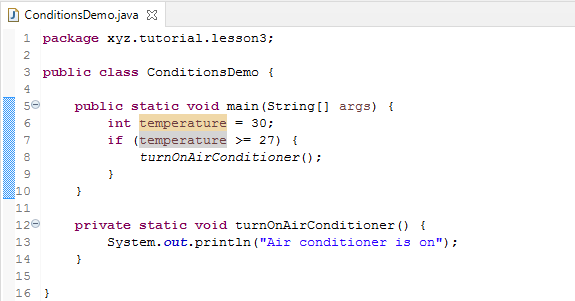
In this program, “if” is a reserved keyword. It instructs the program to do an evaluation of the expression enclosed in the brackets. The condition is (temperature >= 27). When we compare 2 numbers, we can use the following operators:
- “<” (less than)
- “<=” (less than or equal)
- “==” (equal to)
- “>=” (greater than or equal to)
- “>” (greater than)
- “!=” (not equal to)
The format is a little bit different to the arithmetic symbols due to the constraints of the keyboard, but they are still easy to identify and remember. We have to pay attention to “=” in Java that is not a equal sign, it is for value assignment instead. The equal sign in a conditional expression is “==”. “!” means negation in Java. We learned negation in boolean operations in Lesson 2. “!=” means not equal to in a conditional expression.
		if (temperature >= 27) {
			turnOnAirConditioner();
		}
So, if the temperature has a value 27 or greater, then the code in a block enclosed in a pair of curly brackets is executed. In the example, turnOnAirConditioner() method is invoked.
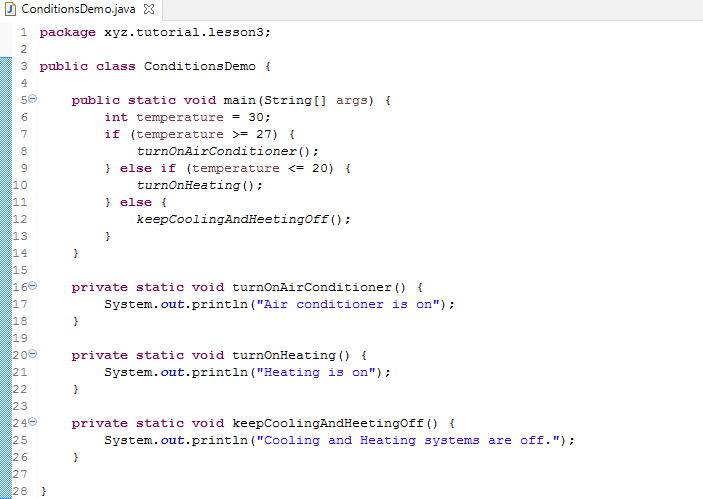
If the room temperature is 20 or lower, we need to turn on heating. This is the second condition. We can add the second condition is this way:
		if (temperature >= 27) {
			turnOnAirConditioner();
		}
		if (temperature <= 20) {
			turnOnHeating();
		}
Nothing wrong. It will work correctly. However, it is not the ideal way because the second conditional expression has to be evaluated no matter the first condition met or not. Since both conditions are based on the single variable “temperature”. These two conditions are exclusive (means they can never happen at the same time, or no overlapping). It is better to merge them into one “if” statement by using “else”.
		if (temperature >= 27) {
			turnOnAirConditioner();
		} else if (temperature <= 20) {
			turnOnHeating();
		}
When we use “else if”, only if the first condition is not met, then evaluate the second condition. If the first condition is met, all the rest conditions will be ignored. If we have more conditions based on single variable, we can append as many “else if” clauses as we need.
Now the “if” and “else if” handles the temperature 27 or higher and 20 or lower. How about the rest between 20 and 27 degrees. The above code segment only handles the case that one of the conditions is met. We can append “else” clause to handle the rest cases not covered by any conditions.
4. “for” loop
A loop means the same business logic is executed repeatedly. It can be presented different ways to fit different situations. A simple loop would look like a child learning counting numbers, 1,2 3, 4, … 10. It has three elements: initial state, loop condition, and step.
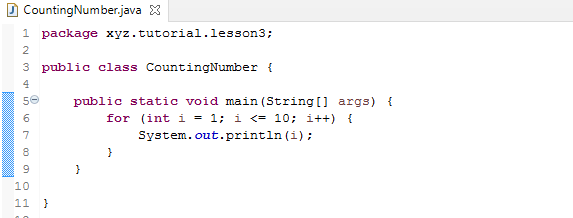
for (int i = 1; i <= 10; i++) { // } is a standard “for” loop. int i = 0; set the initial state of variable i. The expression i = 0 just like a regular assignment, assign an integer value 1 to the variable i. i++ is the step. After each loop, i++ is executed, which increases the value of the variable i by 1. After that step, the loop condition i <= 10 will be evaluated. If the condition met, then start executing the logic of the loop body enclosed in the curly bracket. If the loop condition doesn’t meet, the loop finished and the program moves on to process the next line.
4. “while” loop
“while” is another way to do a loop.
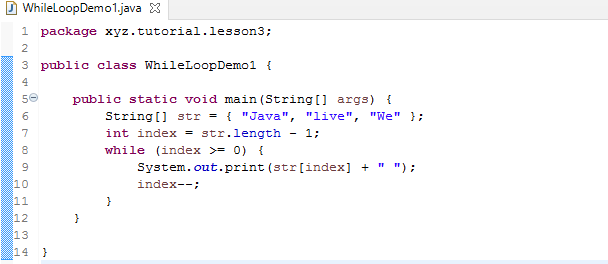
Unlike “for” loop, the “while” loop has neither initial state nor step. If we really need them, consider to use “for” loop instead. Or, we can set initial state and step separate from the “while” syntax. In the example, int index = str.length – 1; acts as setting the initial state. index–; acts as the step. In such a case, we can easily transform a “while” loop into a “for” loop.
“while” loop is very useful to handle collections. We haven’t learned Java Collection. We will revisit the “while” loop in future lessons.
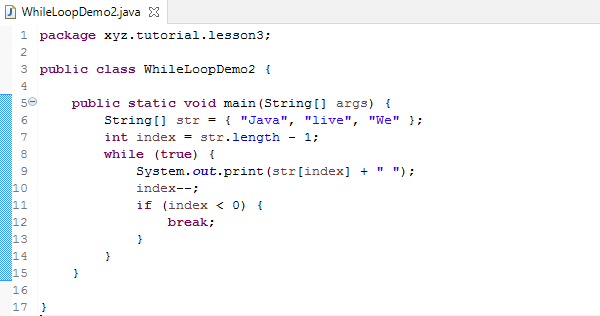
There is a special usage for “while” loop.
while (true) { // }
In this case, the loop condition is always true. So we have to have some logic to avoid the program running into an infinite loop. In the example below, “break” is a command to exit the loop.
5. “do” loop
“do” loop is similar to “while” loop.
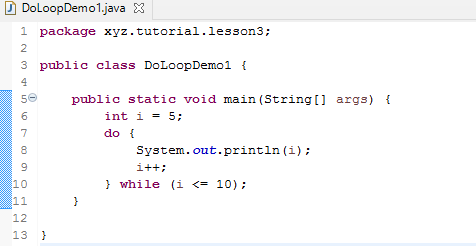
The difference from the syntax point of view is that the loop condition is placed after the loop body, in a “while” clause.
There is an important logic difference between “while” loop and “do” loop. The “while” loop evaluates the loop condition before loop body execution. The “do” loop executes the loop body first and then evaluate the loop condition. So, with “while”, the execution of the loop body is not guaranteed. With “do”, run the code in the loop body at least once is guaranteed. You can modify the example code to set the variable i value to 15 and see the result.
6. Layered Loop
In the real world applications, a loop may contain multiple loops inside it so that they make multi-layer loop structure. For example, in order to print 6 rows, each row has 20 “*”. We need to program that in 2-layer loop.
********************
********************
********************
********************
********************
********************
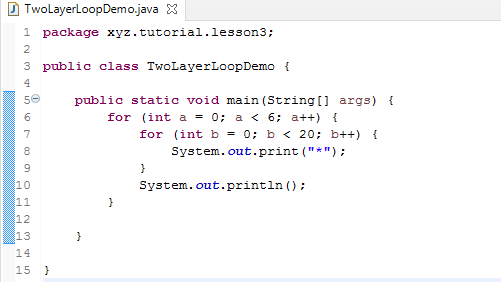
In this example, we use both System.out.println() and System.out.print(). The first one will start a new line after printing. The second one doesn’t start a new line. The cartridge remains at the same location where it finishes printing.
There are two loops. The inner loop prints a line. The outer loop manages the rows.
Exercises
1. Convert WhileLoopDemo1 to use “for” and keep the functions unchanged.
2. Modify the CountingNumber class to make the program count by 2 from 1 to 20 (inclusive).
3. Define an array with 10 elements of any type. Print all elements in a reversed order.
4. Print a triage
*
**
***
****
*****
******
5. Print a diamond
*
***
*****
*******
*********
*******
*****
***
*